Friday, July 29, 2011

Sew what a week!

This week I got much done in terms of sewing for the dresses.  I NEARLY have the wedding dress done.  I need to make up some pleats for a top embellishment and figure out a place to attach my extra adornments from Korea that one of my Bestie's sent me.  Now for my photo stream and captions.

I started out finishing the embroidery for the dress.  
It is a piece for the front layover

Then after tearing away what I could with my hands for the stabilizer I had to go back and pick out all the little spaces between the petals. I did this with a combination of tweezers, and embroidery scissors because I want it to be perfect

Putting the pieces together visually. 
Then I can think about my next step.

 Pinning my pleats for the top of the skirt to connect to the bodice.  I chose 1" box pleats.  Each box pleat takes 6 inches of fabric to make so that was easy to take it from 120" down to 36".

I took a break from that dress and got in the last of the fabric I needed for making the Singer's Dress in the Band.  
These are the pieces laid out on my work table right before I get to putting it together.

After it is sewn and now I just need to Hem it.

What the heck Let's HEM!
 
My favorite foot for doing a top stitch hem.

The dress is basically done, I need one more final fitting with Bethany and then I can add the zipper.

Back to the wedding dress, It is pinned and prepped but I'm still taking a break because I need to figure out the perfect execution of how to go about sewing it in with elastics and other support since this will be strapless.


It really is coming together!  We've been getting in Wedding presents almost daily now and we are about 23 days out from the wedding!

Wednesday, July 27, 2011

Tips to Dye for

I thought it might be nice to share some of my tips for Stove Top immersion dying.  It's nothing that special but sometimes it is just nice to hear what does and does not work on those funky little instructions that come with the dye.  Typically I get all my dyes from Dharma Trading but for this time I wanted to try out something a little more commercial and supposedly easier to use.

 I selected the iDye packets from Joann Fabrics.  Simple enough and fairly cheap with my teacher's discount.  I knew I was only dying natural fibered fabrics such as my silk organza and some cotton and wool items that I wanted to revamp some life into by dying.

Tip #1 Get the dye appropriate for your fabric.  Seems simple enough right.  It can easily be messed up because the packets are all grouped together and it isn't uncommon for them to get mixed up.  Just read each packet and make sure it is the right one to match your fabrics.  Usually it is just divided between natural fiber materials (silk, wool, cotton, linen, bamboo) vs Man made materials (lycra, polyester)

Tip #2 Baste the edges of your fabric so it frays less and keeps it's shape.  This is a huge help to both the dying process as well as the pre-wash to keep your fabric from coming apart or losing it's shape because of one pulled thread.

Tip #3 Pre-Wash your fabric.  It doesn't seem important but it really is.  A lot of fabrics will have some sort of finish on them that you don't think about such as a simple starch to help keep shape.  If these finishes or even possible dirt or previously water marks are not removed then you could end up with inconsistent color in the fabric dye.  Also residue on the fabric might change the reactive nature of the dye itself.

 Tip #4 Do not use a pot that you intend to eat or cook with ever again.  Simply put the dye has chemicals in it.  They may never be completely clean or out of your pot. Are you willing to risk your health or someone else's on the chance that they ingest something not necessarily toxic but not safe either?  I bought my large soup pot just for this purpose and I bought the other one from a thrift store because I would never trust using a thrift store pot for food anyways (because I'm anal like that).

Tip #5 When the Instructions tell you to not put the 1/3 cup of vinegar directly onto your fabric you should listen.  Ok for these iDye instructions it tells you to dissolve the dye in the hot simmering water first, then put in your fabric then put in your Vinegar.  It is kind of darn hard not to get vinegar directly onto the fabric with you are pouring it into the mixture.  I finally just put it in after the dye was dissolved and then put my fabric in.  What happens if the vinegar touches the fabric is wherever it touched it gives off this instant reaction and that particular place will have a very vibrant section, It gives a bit of a tie dyed look but in shades of the color which can be cool if that's what you want but that is not what I was aiming for.

Tip #6 Timing is everything.  You see that bright and vibrant yellow I have on the far right side of this photo?  Now look at the far left and see that gold like olive green swatch circled in pink.  Those are from the same dye bath.  The difference is the timing. I followed the instructions completely for the first one which had to simmering my fabric for 15 minutes and I got the dark olive shade yellow.  I tried again keep close watch on my time and how the color was seeping into the fabric and pulled it out when I felt it was saturated enough.  I kept the dye pot going while I cold washed the fabric to make sure when all the dye was out it was still holding the color and vibrancy I wanted.  Luckily it did, had it not back into the pot I would of put it.

Tip #7 Cold wash it in the machine afterwards.  I personally like to cold wash everything I dye afterwards in the machine because most likely whatever I dye will go into my washing machine at some point so I need to make sure it will retain it's color through the wash.  This also helps a lot to get the excess dye out.  The biggest thing is how with natural fibers it helps to set the color.  Natural react to heat the same way we learned most molecules do back in science class.  When something get's hot is expands, for natural fibers that means they open up enabling them to be changed by fabric manipulation or color (which is why we use hot simmering water for dye baths).  When something get's cold it compresses, so once the dye is in the expanded fibers you close it up with the cold water to lock it into them.

That's all I've got for you folks~!  Good luck and happy dye-ing!

Monday, July 25, 2011

Mad Seamstress Weekend Re-cap

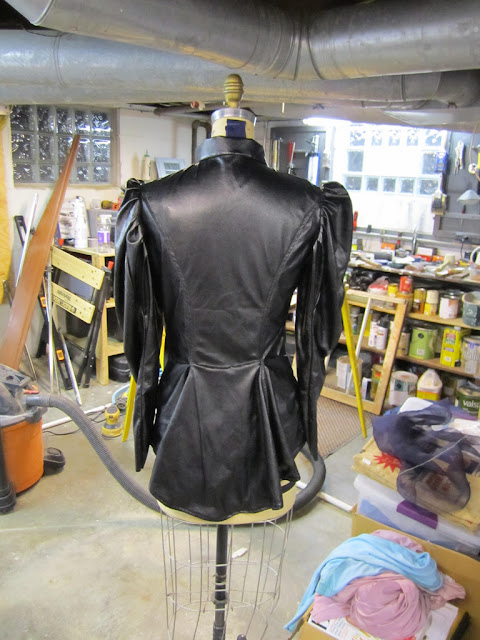
This past weekend was wicked busy.  I did so many things for the wedding it felt good but it was a little crazy as well.  My flower girl dress is done except for some closure buttons, My wedding dress Embroidery is on it's last stages, finished the black stretch vinyl jacket for my friend, a Client fitting and my my niece's flower girl dress fitting and dying the fabric for my Reception dress.

Amongst that was a field trip with my College Preview Students to Joann Fabrics for their finals.  Watching Monty Python and the Holy Grail with some friends while making wedding decorations and random Army men Pins.  I also attempted to use these little Fruit appliques to my nail that I think were thing sliced Fimo.

Now for a stream of photos to show you what I did.
 Dye Baths,  I prefer to do the stove top kettle method of Dying


 I had to borrow my friend Sheila's Designer SE because unfortunately as much as I love my Brother Innovis 900D I needed to embroider much larger then a 4x4" section.


 My silly nail Embellishments

Finished Jacket!


 On the Short Bus with the Kidlings from College Preview Fashion Fundamentals.

 My Clever TA and Former College Preview Student Graham


 Finished Embroidery for my Niece after her fitting and the straps for her dress.


Finished Dress!


Lastly my final products from the Dye baths for my Reception dress.  Jewel Tone rainbow
As you can see it was indeed a busy weekend but productive.

Friday, July 22, 2011

Tatting

I know I made a promise of Tatting post that I missed my deadline for but this has been a crazy week.  I might of made some bad choices in how I spent my evenings adding to my already exhausting schedule.  This caused me to have delirious dreams like being married to Thor (the hot recent movie version Thor) but lost in a strange mad Carnival just like the series Carnivale.

Anyways.... The point is I was sick with exhaustion Wednesday and called in sick at work.  Then I had to muster the strength to be able to teach double classes in the afternoon and evening.
Enough excuses and eye candy we move onto my experience teaching myself tatting with a Book and some bad you tube tutorials.

This is the book I used.  I got it from my Library.  It had very high rating on Amazon so I thought it must be worth it.  I opened it up to see the drawings below and the words WTF immediately slipped through my lips.  I knew it would be a bit painful and certainly repetitive and cramped fingers with many curse words and hours.
I was able to decipher being able to do the first know and what I thought was the second knot.  Oh how I was wrong.  I attempted to watch some you tube videos showing it but I was left with more WTF's wondering who these people were and how unexciting they were, lot's of heavy breathing and strange background noises as well. 

This was my first bloody attempt and you can see the shuttle I am using.  Below is how twisted and mangled it was because I thought I was doing it right but really I wasn't.
It took me something like 3 hours to do this tiny piece.

This one below is when I had my AH HA moment and got it right.  Then of course I jumped right into a much bigger and more complicated pattern.

Ta Dah!  I got this in the bag!  My nearly finished larger flower tatting.  That only took me perhaps an hour to do the entire piece.  I am getting better and faster.

When done right it looks beautiful.  I can easily see how this could occupy a lot of your time back in the Victorian days before TV and lot's of parlor sitting.  How it shows a lady's grace is beyond me.  I am very happy to add this new talent to the things I can do however I am not sure I can use it as I had originally intended for pieces in my design work.  We shall see.

Tatting like a lot of fiber arts is a series of knots or loops arranged into a pattern.  I feel that bobbin lace and tatting are like cousins to each other where tatting is the more simple process.  These are words that should of probably been at the top of the blog instead of my eye candy Thor, but isn't eye candy Thor better?

Thursday, July 21, 2011

TiLT - Harry Potter Edition

I did promise Tatting photos and a post about it. I didn't forget but it's Thursday.  So I post this today and tomorrow my post on Tatting. I can for sure say it will go up because I already did it. I just need to press the button to publish it. Cheers!  (P.S. That was a lot of strange short statement type sentences which I am not fond of but I shall leave for now)


1. This week I saw the Harry Potter Deathly Hallows Part 2.  It was good and it felt like it was finished but I don't think I could easily watch that again the way I have with the Lord of the Rings Trilogy.  That being said there was so major hotness!  Yes I know very mature of me.  At least these boys are legal even if it makes me feel a bit like a cougar.  Which brings me to my #2.

 2. Matthew Lewis AKA Neville Longbottom.  My how the children have grown.  Even better there is an appreciation blog of this man's gorgeous smile.  "fuckyeahmatthewlewis"  It's not a lot but it's enough to bring a goofy look to my face and brighten my day.

3. Emma Watson.  What a darling women she has become.  I could stare at her photos for hours.  She just exudes this kind of quiet intensity.  She reminds me somewhat of Audrey Hepburn, a girl who's got it together, intelligent but still soft and stylish.  Her Pixie haircut is killing me in jealousy!  I wish I could pull something off like that especially in this heat.

4. Toys.  Thanks to the Harry Potter Franchise we have a huge assortment of toys spanning through the years that we can look forward to showing up as age, as our children age (well for those of us that already have children (I'm not one of them)).  I look forward to seeing photos of these nostalgic toys perhaps in Robot Chicken Stop animation someday or just the quirkiness of Diaramas.

5. Books.  For a time these books had new reader's gripped to them and have given a younger generation an appreciation for the written word.  I can dig anything that helps promote reading.  They are fairly easy reads and I know people in all age groups who have thoroughly enjoyed them.

My runner ups for TiLT and just some other Harry Potter Nonsense
 6. Professor Minerva McGonagall best dressed witch ever!  She is how I would dress if I was a witch.  Hands down I feel like she is a combination of Eiko Ishioka, Martin Margiela and Alexander McQueen in the way that she dresses.

7. Rupert Grint & Tom Felton...... I would of mentioned them earlier but I didn't want to seem like I was a cougar on the prowl, especially since I am marrying the love my life in a mere month.