Showing posts with label wedding. Show all posts

Thursday, July 19, 2012

Craft Wars Episode #4 - Alter or Falter

Hello Friends! So the other night was a little bit exciting eh?
My one hour of craft nightmare on national TV courtesy of TLC's Craft Wars has finally passed.

It was an amazing experience but even better was all the love and support I received from friends worldwide and locally over the show. The theater was sold out with over 120 people in attendance, the overflow they let sit in the lobby bar and put it on the bar TV's. We raised a good amount of money for the Mid Ohio Food Bank and had a great time heckling the entire time.

Now get ready for a doozy of a post. Next week I'll re-cap about things I learned from being on TV, and how surreal it is with the social media that we have today.


For now the Episode.......
We started with the usual pop craft. Our theme was to make a keepsake box using locks and keys. Very cute concept but honestly someone could play with it for days arranging the keys and colors and items from the craft closet. There was so much in there it was hard to keep track of and you only have that one hour to make it. The locks and keys were a huge mix they included things that I hoped I didn't have to deal with which were heavy heavy duty padlocks. It was really tough to work on something for a child when it weighs so much. Also waiting for glue to dry or potentially paint is a fiasco so I totally feel for the all the pop crafters using so much felt. Spray paint would of been my first choice if I had better colors to choose from in the wood shop. I went for the fabric paint purely on color choice and it was a brand I thought I knew and used extensively when I used to teach high school kids summer workshop at CCAD. It obviously failed us miserably with our lace stencil and hopes of a pretty hill. We moved on hurriedly and unfortunately felt was the quick fix *whomp whomp*
I was very adamant about having the inside of our box lined so that when

While working on our own craft furiously we had no idea what was going on with the other crafters so watching the show was the first time I got to see how they were working and what their pressures were. It was also surprising the things I don't remember saying and the things I do remember. Such a whirlwind.

The Judging on the Pop Craft was per usual a bit rough. Also going first did not help the feeling of anxiety. I was evidently torn apart for my lack of color but what could I do? The top was doused with rhinestones but you couldn't see it so well in the show. It might show up better on the still photos when they get posted.  In the end I still moved onto round 2, the Master Craft!

Now this half was really tricky.
We were asked to make a large scale craft to be included in someone's wedding. We had to use the materials given to us.
  • Old Jeans
  • Baby blankets
  • Candlesticks
  • Wedding invitations
Very random and not easy to work with. The baby blankets were like the ones they use to cover a newborn baby at the hospital. not very big and not a good material. I had high hopes of making a lacy looking snowflake out of the blankets that just kept looking like a really bad kid's craft, thank god they didn't show that.

The jeans were just that, old in every variety and state of wear you could think of. There were a lot of children sizes and acid wash (I'd like to think that was a throwback to 90210). To work with them well, it was denim so no big mystery. I do it all the time when I have worn out jeans and I don't want to waste the fabric. I was a little sad I didn't bring my own sewing machine on set because she would of been MUCH faster the the Singer machines we had on set. I kind of wanted to scream at the machines for being so slow (I probably should have).


The Wedding invites were the only paper product supplied to us and you would of thought they were super versatile but it was a bit hard to work around the graphics already printed on them. Also the colors of the invitations with the jeans and baby blankets kind of dictated what this wedding projects color scheme would be. TONS OF BLUE! with splashes of pink.

Finally the famed Candlesticks. Those were not even on my radar at all! I think about halfway in I started to play with them and thought it would be fun if I could get the light fixtures to work with them. Lo and behold they fit into the candlesticks perfectly! Then it was all about incorporating them into the overall look.

This entire time I was barely paying attention to what Andrea was doing b/c I was so engulfed in my own project. The helper's we had on set were also fantastic. I was blessed with two men who were not only cute but also both skilled at wood working. My frame went up with hardly any help from me. I drew out the plans, told them the measurements and I bored holes for stringing up the garland afterwards.

It was a very long day since everything is shot at once but watching the show it went quick as a bunny. During the final Judging it was nerve wrecking and I felt like I wanted to cry but only out of exhaustion. I very well would of just collapsed on the floor and laid face down if I didn't care about proper etiquette. Yes there were things I would of done if I had more time but we didn't and this is what I came up with, with my team and Bestie Claire. We worked damn hard and I'm still proud we got it all done. of course it was bland is colors we only had so much choice and well it's a photo booth for a wedding.  I would hope the guests would be the central point of the piece and not what was behind them. Photo booths are meant to enhance and add some levity for pictures.

Things I would of done if I could of hand more time. Clean up the garlands more, done some extra flower accessories on the ground around the bench. There was this large White flower cone I made which at the last second Claire told me looked weird so I hid it. I should of just kept it out to show I  had another piece for the photo  booth but woulda coulda shoulda's won't get me that 10K.

Was I disappointed? Not really. I was on flipping national TV for an hour. I got to go to LA to film this. I had fear reign of a ridiculous amount of craft supplies to make something I always wants to anyways (although I would done other materials and given myself a month to make it). How can someone complain about an amazing life experience such as that? It's just another thing off my large and lively bucket list.

Next up! Getting some celebrity to wear one of my designs on the red carpet for an event.  Ideally the Emmy's or Cannes Film Festival (just saying).

If you would like to see pictures from my DIY wedding last August here is the link from my Feature on Rock N' Roll Bride!


Monday, December 19, 2011

Rock n Roll Bride

Hello!In the bustle of this holiday season I forgot to mention that I am a Rock N Roll Bride.  Last week our wedding hit the UK blog full force and it was a great little shine in the spotlight.  I put on a few of my favorite photos but you can see our post here.


Here are some candid ones from different guests and friends


Having fireworks going off at the baseball game behind us was the perfect ending to an incredible day.  Those are the kinds of magical things you just can't fake on a wedding day.

Wednesday, October 19, 2011

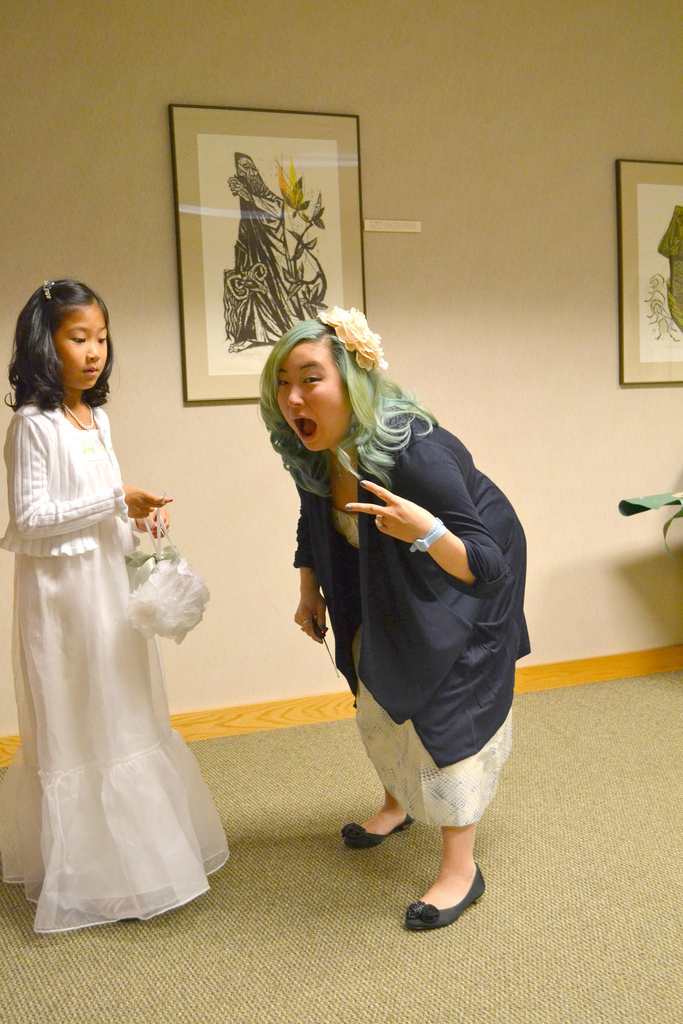
OOTD - Wisconsin Wedding

Doing a little backtracking on my Brother's Wedding in Wisconsin.  It was back on October first and their colors were Creme, Orange and Grey.

Anthropologie creme cotton dress that has slate blue/grey geometric shapes
Navy Anthropologie Drape cardigan
Coach Black and Grey Flats
Peach silk flower hair clip from AGACI in Chicago
Swatch baby blue watch
Emerald and gold Necklace from my Mother as a Birthday present

The shoes and pattern design of the dress up close.  The shoes had these coach logo silk rosettes for decoration that I hadn't seen on any of their typical store items.  I think It was a runway item since I got them from Filene's Basement. 
Speaking of which for those readers living in Columbus the Filene's Basment on Sawmill road is closing it's doors this Sunday (boo).  You can read the Article here.

My Dad and Me
A somewhat rare picture of us together and dressed decently.  Usually when I see him one of us is wearing sweats and hanging out at the house sick or being a couch potato so we hardly have a good reason to dress up together.

All the Men together Dressed up.
From Left to right my oldest brother Ed, my Husband Andy, my Dad and my middle Brother David who was getting ready to marry.

My Mom and Dad waiting for their turn at pictures with the couple and family.  I love that my mom wore her Hanbok for all three of our weddings.  It just seemed appropriate.  It's so pretty also how could you not want to be in the swathes of that pale green organza with delicate flower embroideries.

My Nephew got to wear the male version Hanbok as the ring bearer.  You can see it was a quite stressful for him.

Lastly I just had to throw in this picture of me and Niece.  She's really growing up quickly and such a pretty little girl.  I'll have great fun with her when she's a teen and we can go shopping together.

I know when I go to Weddings I always pay special attention to what other people are wearing do you?  If not maybe it's something fun to think about next time you are at one.
Cheers!

Thursday, October 06, 2011

Still Alive

One of my Favorite little geeky Songs was from the Ending of the first Portal.

And now you are probably wondering what in the world this has to do with anything.
Simply put I am still alive and not giving up on blogging even though I have been incredibly behind.  I've just been sick since I came back from my Brother's wedding in Madison, Wisconsin.  I have not been ideally sitting by and doing nothing however.  I have been in my moments of health actively working on my stock for Craftin' Outlaws and Crafty Super Market.  I am however being incredibly forgetful to take any progress pictures.  I have been working on an assortment of clothes to bring to the shows such as skirts, capes and maybe a jacket or two.

Also in my life I have been preparing myself to delve deep back into Academics and Art by applying for Graduate School.  Something that I hate to do only because I feel like it is something I should of done long ago.  It is however necessary for me to continue to grow as an educator since that is what I would like to be doing full time.  I scary thing is doing a new portfolio from scratch.  I haven't been working on anything in terms of new artwork in years.  I need to get the creative juices flowing again and focus on some themes of work.  I've picked a few local art exhibits to apply to just to help me focus some more and give me some deadlines.

Anyways this will be short and sweet and I promise more this week and next in a stream of interesting posts.  I end with a photo of my brother and his happy bride in the dress I made for her.

Thursday, September 29, 2011

The Stitches in a Dress

I know this isn't a TiLT.  I will get back on that bus next week but I still have so much catching up to do after my own wedding it is still insane.

This is the Epic Blog post about me and the most recent wedding dress I completed for my brother's fiancee.  Before my wedding we had discussed her and they had sent me links for some things that they liked.  Then as we got closer the link for their favorite dress was no more.  In hindsight I should of just taken a screen shot and made a JPEG to keep in my Evernote files.

Anyways we found a J-crew one that she also keen on.  It took me about 18 hours of time to complete over a week and a lot more hand sewing then I had expected because she wanted some extra draping that wasn't part of the original dress.  The dress is a silk crinkle chiffon strapless sweetheart.  

A little background, we never had time between my wedding and theirs to meet in person for a fitting.  The only fitting we did was a muslin mockup of the bodice which I mailed to them and they tried it on over the Xbox 360 Kinect so I could see her full body and proportions. 


For a strapless dress of any kind you start with the interior structure.  You need to make sure that this puppy stays up and holds all your bits and pieces in as well.  I had an inner portion with boning sewn in for support.  If I was hardcore I would of used Steel boning with casing.  I think that would of been a little too heavy for the fabrics in this dress.  Rigilene boning is also convenient and sturdy.  The inner lining with the boning gets sandwiched between another outer lining, the silk and another layering of lining that goes on the the inside.  
A lot of times when doing corsets if you muslin was a good mockup they will sew the casing and boning to that as your insert for support.
These are the lining fabrics and the silk Chiffon that I ordered
Whenever I get silk in the mail I'm always confused because the packages are so small and I am always making such voluminous garments from them.

You should already know this but before cutting anything out you always want to iron your fabric to make sure you aren't unintentionally make it bigger by cutting the fabric out with wrinkles.  Personally when I am working on such an important piece for a client I want full perfection wherever I can.  I will iron out the entire yardage of fabric that I am cutting on.
Also do not just cut off the amount you need from the entire yardage.  That is wasteful.  you want to keep the yardage together because you never know when you may need to do some shifting and adjustments.  Cutting off the extra 2" just adds up when you could of have plenty of extra yardage left over for another project if you hadn't of sliced it off to begin with.

After the ironing and laying out of the fabric I put my patterns down with fabric weights.  My center front pattern on the fold. I do not like pinning my fabric to my patterns.
Firstly because my patterns are of heavier stock (butcher paper or painters paper) so it is not very easy to pin through them.  Secondly every time you pin up the fabric it changes the shape  and pulls more the fabric so that you actually cutting slightly bigger from the pin ups.

I also make my patterns with no seam allowances.  I find it annoying and yes it might be extra work but I just use my clear ruler to add in my seam allowance each time.  Also if I am using the same pattern but for different people I can make better on the spot decisions of where I might want to grade a seam up a bit.  I also do a lot of pattern mixing for new designs since I already have a good bodice or pant pattern why would I want to make another one from scratch?  Leaving them without seam allowance allows me to be able to draft with them whenever I want to make an entirely new pattern and without having to worry about adjusting for the seam allowance.

Just to show you how sheer the silk was that I was working with and delicate!

When I am not using a fabric immediately I hang them up to help keep them from getting wrinkled.  It also helps to "settle" the fabric much like the foundation of a house.  Hanging the fabric let's it get all the threads in order and that also helps to ensure a better more accurate fit for when you cut it out for the garment.  I know it is a rule for Bias to let things hang on the Bias for 24 hours but I do it with my fabrics on the straight grain as well after ironing or pressing them.

Perfect example of why I don't use seam allowances on my pattern.  Here I am drafting the draping to go over the bodice on the dress.  Since it will be asymmetrical I needed to have both sides of the bodice traced.

Then I drew out how I wanted the fabric to be draped in the shape.

Then I increased the amount to account for the shirring or gathering that she wanted to go across the bodice.  This is all just guesstimating at this point.  There is no real good way to see in flat pattern what it will be like on the body until the muslin.

Which is what I did next.  In all seriousness when you are doing a muslin of something that you know is going to be a much lighter or heavier fabric then the muslin then you should do that mock-up in the same fabric as the final or a cheap alternative that is approximate to the same weight, feel or type of fabric (knit, woven, felt etc.)


After cutting the muslin and trying it on it seems to fit well.  Oh man was I ever wrong!  I should of really heeded my own advice and used and similar fabric to the silk because there was so much that just wasn't working quite right that I couldn't see because the muslin was so stiff and not falling properly. 

I measured out the changes I wanted to make and increased using the slash and spread technique in drafting.

I didn't like how high the bodice drape went for the gathering so I decreased it back to bit the bodice and then extended the gathering at the bottom.

Here are the completed adjustments that I made hoping against all that it would work out.

This is the bodice before the gathering pieces were attached. 
The pieces that I drafted did not fit at all!  This is one of those instances where no matter the good intentions and effort you put into drafting a pattern when it comes to something with a draped look it is just better and easier to go ahead and drape that cuss. 

I hand basted the edges of the fabric I was draping so it wasn't a total shot in the dark with the gathers and pinning.  There was an abundant amount of hand basting and gathering for this dress.  The silk was so delicate and I have not (unfortunately) invested in walking foot attachment for my sewing machine yet.  A walking foot would of made sewing a light fabric against the slippery lining a simple task.

Starting over and with draping

More Hand basting of the draped pieces on the the plain bodice to keep it together when the final sewing on the machine.

All the Layers lined up and pinned ready to be sewn.  There were 5 layers to make the bodice and at the waist seam there are 8 layers of fabric sewn together.  Everything was doubled lined due to how thin the silk was.

 
The completed draping with the hand basted and gathered skirt attached.
After the pieces of the draping and the skirt were sewn together with all the layers of lining and boning insets.  I would of shown you pictures here of the Zipper being installed but it was a mess.  Not done badly but the swaths of fabric layered all over my desk you couldn't even see the zipper.  It was also fighting me to stay in place with the lining and silk together.  It was yet another place where to get perfection I had to hand baste it in before machine sewing it. 


Sewing in the last back seam before working on the hem!

Oh the Hem! How fun it was for me.  I have fortunately worked in crinkle silk chiffon before and it is no fun kids.  you can't do a normal narrow rolled hem on the machine because the crinkle will make it stretch for day and if you stretch it too much you will have this weird extra wide hem stitch that floats at the bottom like hoop skirt boning.  You would hand roll and hand stitch in the hem but that also takes a long time.  Actually I don't think there is any clean and professional hem you can do a wedding dress without it taking a long time.  People might be tempted to do a rolled narrow serge stitch with wooly nylon but I feel that is just cheap looking and a cop out especially for a wedding dress.

What I did was I made my seam allowance for the hem 3".  I do a machine basting stitch across the bottom 1.5" from the end of the fabric (I also tore the fabric so it would all be on the same grain line instead of cutting it, that way I knew i was getting the right and even measurement all the way around.  Tearing the fabric is something you need to plan out and put into your pattern before you ever first cut any yardage. 

After the basting stitch I carefully press (not iron, which would be doing a back and forth motion across the fabric) the fabric on the basting stitch.  The Basting stitch serves as a guide and foundation for the hem.

After the first pressing is done I press it again so that the basting stitch is on the inside facing upwards. I used the basting stitch as my foundation for the hand blind hem stitch that I sew in. 

This is how the final pressing looks before I started the sewing. Which I also regrettably do not have photos of since it was about 1am on Wednesday night and I had work at 8am the next morning.  Trying to get things done on a deadline especially when it is such a momentous dress in someone else life is killer.

 
I played around with some ideas for the back since I was attached a mid section sash.  I didn't like the gap between the draped bodice top and the skirt gathering.  It just looked strange so I add the sash to make it all more cohesive.

The Finished dress on the form.  I didn't send the little rose.  I thought about it and the personality of my brother's fiancee and she isn't into cute little accessories.  She is very practical likes things simple on her

Here is the finished dress when she tried it on at arrival in the mail.  Not a bad job for never doing a fitting in person, I need to adjust the draping a little on the front to lay better and it was slightly too big but easy for me to take in.  I patterned this dress in a way so that I could easily take it in more or let it out.

I head for the wedding tomorrow morning in Madison Wisconsin with my sewing machine and hand needles ready to make the adjustments as soon as we arrive.
Wish me luck!