Showing posts with label reception. Show all posts

Thursday, September 08, 2011

Oh HAI!

Hello, it's been a while.  Sorry for the Hiatus but I got Married!
 It was August 20th, 2011 at my home church with my Youth Pastor from a kid being the officiant.  I won't go into a lot of details right now because I'm still sorting photos and I'm way behind on blogging other things such as my NYC and Lake House Bachelorette trips amongst other things.  I also have all my Honey Moon Photos to go through from Londond, Paris and Rome! It's been such a whirlwind and my brain is still only functioning at maybe 45% right now. I also want to wait till I get more photos from the wedding in from my Photographer (The Rogue Magnolia) before I make a big official everything post from the wedding.

Here's a small taste from some friends photos.
This First one is one of my Favorites.  A Polaroid by my friend Claire!
BAM!


 Yes, Somehow our reception ended with Fireworks thanks to a Baseball game and Britney Spears concert going on down the street next to our Venue!

And a sneak peek from Candace aka The Rogue Magnolia

Thursday, August 11, 2011

Ending the Reception

I finished my reception dress last night.  Around 1:00 am I slipped it on and looked in the mirror, quickly put on my Vivienne Westwood rocking horse wing shoes and just stood happily in front of the mirror.  Below I'll you some of my progress from working on it the past couple days.  Unfortunately no photos of me wearing it quite yet.  I want the suspense to continue.

 So here is the dress when I was attaching it to the embroidered bodice.  At this point I wasn't sure what I was doing for the hem and I liked the gold lining the best underneath the jewel tones.

A detail shot after I had gathered and then basted in the lining before I made my final decision on whether to keep it or not.  I think it gave it just the right effect that I wanted.

Originally I had some horse hair braid that I wanted to put in the bottom of the hem to give it some structure but that was a mess.  I attempted to place is 3 times with basting stitches and it just kept looking wrong and not very clean since the organza was so sheer.  When I tried to double roll the organza it just made it look awkward with a heavy strip of color at the bottom.  I thought out of frustration I would pin it up to see how a bubble hem would look.  It was magical.  Good things happen when you least expect it. 

 Here the bubble skirt hem!  It looks so sweet and it worked out perfectly but I didn't stop there.  I still wanted to add some pizzazz and to make sure this puppy wouldn't fall off of me while dancing and singing my heart out at the reception.

I loosely pinned in some ideas for a multi strap that would also serve as a nice embellishment.  Nothing super fancy just a little weaving and creative placement.

 I made very narrow strips and then pressed them flat to work as thin straps and clean the look up.

 These are the final layout of the straps and a little embellishment  before I attached the inner bodice lining and zipper to finish her up.  I'm very happy with my results.


Thing's are getting real around the house.  We having near daily deliveries of gifts, and supplies for the wedding.  Yesterday our tote bags for out of town guest bags were dropped off and made by the Wonderful Alison & Nick Nocera of Alison Rose.  I love them!  I'm happy there will be a few extra so that I can keep one for myself.  
 I've been crazily cutting little squares and folding petals of fabric for my own Bouquet.
 I put the finishing touches on the Grandma's Corsages.  I wanted to them to be the same and different at the same time.  I think that I accomplished this pretty well by choosing some different colors to add in combination with the overall green in the petals.
Yet there is still so much more to do!  I have buttons to sew on my niece's flower girl dress to finish that off.  Bowties for the band members. Adjustments on the singer's dress.  Boutonniere's for the groom's men. Put together the pieces for the Bridesmaids hair bands.  My blusher Veil for the wedding Ceremony.  My ceremony jacket and train. Bouquets for the bridesmaids.  Paper Jellyfish for decorations.  I think that bout covers it in the "DIY" department.
Some things I can wait to do two days before the wedding since they will involve fresh flowers from my garden but that is still quite a bit to do.  It will get done, I will love it.  Remember it's not just DIY for a wedding but DIFY (do it FOR yourself),  if you don't enjoy it don't do it! ( I'll write more about that mater post wedding madness).
Cheers!

Thursday, August 04, 2011

Opening Reception

Now that the Wedding Dress is done I am moving onto my reception dress.  This is another play on the Korean style dress with a Western feel.  In this dress I have decided to keep the more traditional coloring for this dress but making it a short fun dress that normally would be totally inappropriate for Korean wedding.  But this is just the reception and I want to dance and have fun!

My other Best friend in Korea sent me these gorgeous embroideries as a wedding present.  I decided to use the bottom one as my bodice top.  It is wider then the one I am using for  my wedding dress and I am planning on putting straps onto this.  The upper fabric since there is more yardage I am going to attempt to make it into a short Korean style jacket.  The Fabric is much more stiff and I need to pre-wash it but I'm scared to do that.  Perhaps I will wait till the entire jacket is constructed (if I get that Far) before I do the wash.

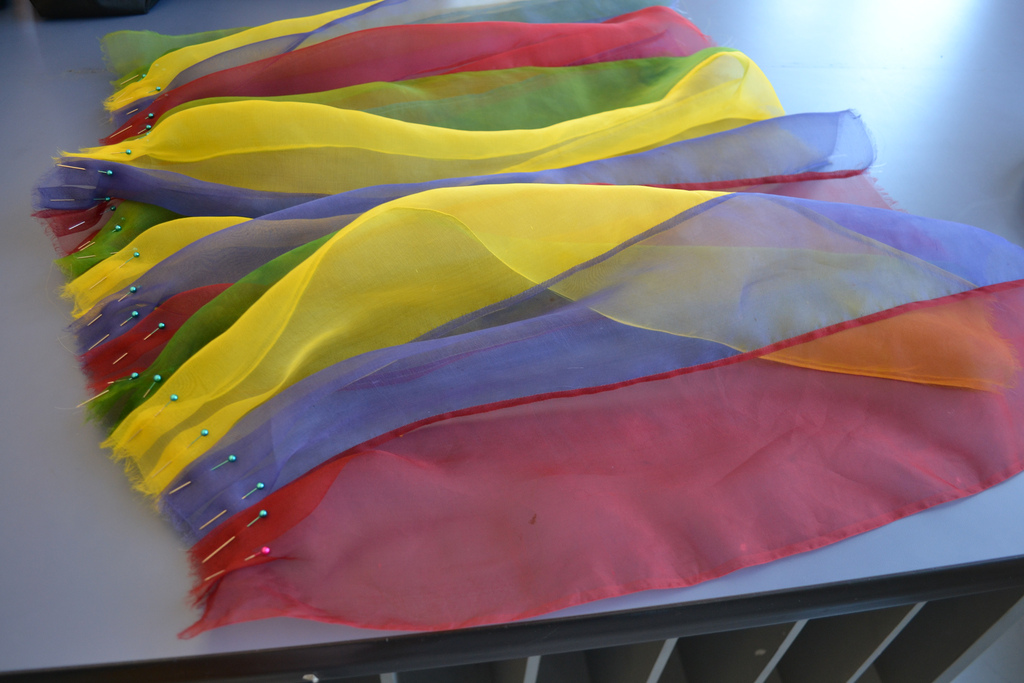
These are my colors for the skirt.  Right now I just stitched the strips together but the finishing on the edges was proving to be a problem.  Since this is sheer I didn't want to bulk it down with serge stitches on the inside or have them show through.

My Solution was using "invisible" thread.  It's like a very low gauge fishing line.  There is some strength behind this thread but you need to watch the tension as it sews and adjust accordingly.  It also likes to slip out of tension so if you are not careful when winding the bobbin you can create loops the bobbin which will mess up the stitches as you come to them.  Another weird quirk I ran into was how occasionally the thread would get double wound or caught up in the tension discs while sewing.  In hindsight I should of used a drop or two of Sewer's Aide on the spool to help glide it through the machine.


For finishing the seams nicely I decided to employ my skills at doing french seams.  When doing french seams the most important thing I feel is proper and frequent pressing.  I like to do my french seams in this order.
  1. Sew with wrong sides together 2/8" seam allowance
  2. Press with iron low steam the tiny seam allowance to one side
  3. Turn fabric so right sides are together and press at seam closed
  4. Sew with 1/4" seam allowance (with right sides still together)
  5. Press french seam to one side
Aren't the results lovely?

After the french seams I put my pleats in to take it from 106" down to a mere 36".  I'm very excited for these colors and how this is shaping out.  I need to baste down these pleats and then I can start to attach them to the embroidered bodice piece.