Showing posts with label silk organza. Show all posts

Thursday, August 04, 2011

Opening Reception

Now that the Wedding Dress is done I am moving onto my reception dress.  This is another play on the Korean style dress with a Western feel.  In this dress I have decided to keep the more traditional coloring for this dress but making it a short fun dress that normally would be totally inappropriate for Korean wedding.  But this is just the reception and I want to dance and have fun!

My other Best friend in Korea sent me these gorgeous embroideries as a wedding present.  I decided to use the bottom one as my bodice top.  It is wider then the one I am using for  my wedding dress and I am planning on putting straps onto this.  The upper fabric since there is more yardage I am going to attempt to make it into a short Korean style jacket.  The Fabric is much more stiff and I need to pre-wash it but I'm scared to do that.  Perhaps I will wait till the entire jacket is constructed (if I get that Far) before I do the wash.

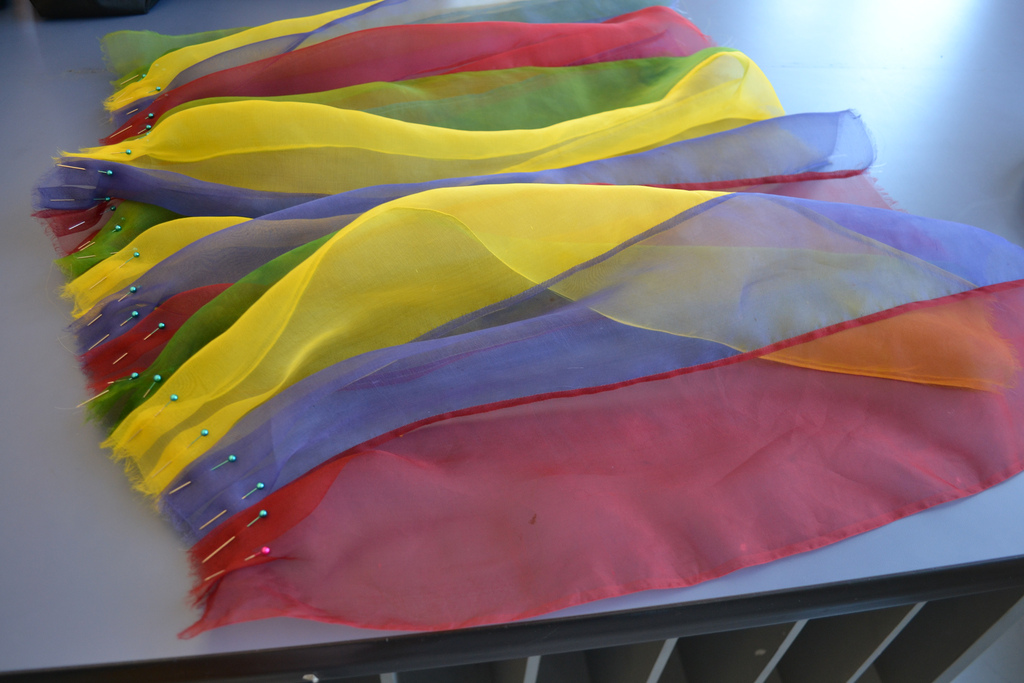
These are my colors for the skirt.  Right now I just stitched the strips together but the finishing on the edges was proving to be a problem.  Since this is sheer I didn't want to bulk it down with serge stitches on the inside or have them show through.

My Solution was using "invisible" thread.  It's like a very low gauge fishing line.  There is some strength behind this thread but you need to watch the tension as it sews and adjust accordingly.  It also likes to slip out of tension so if you are not careful when winding the bobbin you can create loops the bobbin which will mess up the stitches as you come to them.  Another weird quirk I ran into was how occasionally the thread would get double wound or caught up in the tension discs while sewing.  In hindsight I should of used a drop or two of Sewer's Aide on the spool to help glide it through the machine.


For finishing the seams nicely I decided to employ my skills at doing french seams.  When doing french seams the most important thing I feel is proper and frequent pressing.  I like to do my french seams in this order.
  1. Sew with wrong sides together 2/8" seam allowance
  2. Press with iron low steam the tiny seam allowance to one side
  3. Turn fabric so right sides are together and press at seam closed
  4. Sew with 1/4" seam allowance (with right sides still together)
  5. Press french seam to one side
Aren't the results lovely?

After the french seams I put my pleats in to take it from 106" down to a mere 36".  I'm very excited for these colors and how this is shaping out.  I need to baste down these pleats and then I can start to attach them to the embroidered bodice piece.

Friday, July 01, 2011

From the Mail

This was a dress I saw on Ruelala last week. I knew this dress very well.  I had tried it on in Vanilla Cream at Saks Fifth Avenue around Christmas time with my mom.  This was when I was still playing with the idea of just buying a dress because I didn't want all the pressure to make my own.  Which I have ended up doing anyways.  Aside from all this I still wanted this dress.  It was gorgeous and perfect and I knew I could wear it to multiple weddings since it's not "white" as long as I had accessorized it and such the right way.  Also it makes the perfect Rehearsal dress.   My dilemma was Soft Baby Blue or the Vanilla Cream.  The dress is by ABS by Allen Schwartz.

Through the help of Facebook polls and friends online via Twitter I made my decision for Vanilla Cream.
Here is my little saga and joygasm of opening up my pretty dresss at 1/3 of what it would cost retail.
I love how they have this little cut out so that the hanger is stable in the box and the dress and freely hang  around and wasn't being smushed by loads of peanuts or bubble wrap.

VOILA!

The fabric is a sheer Silk Organza with a poly horse hair 2" in the hem.
Tacked pleats and poly horse hair bow adorn the bodice
The lining is just a silky polyester thing with some light plastic boning.
Finally the Zipper is not what I expected or remembered before.  I think the original run used an invisible zipper but I don't mind.  Since having all that pleated and gathering fabric by a zipper is an easy way to get in trouble and have it ripped by getting caught in the zipper.

I've tried it on and it is just as perfect as it was at full price back in December.  This makes me excited and I can't wait till I can wear it all day before my Wedding.  I approve of it's craftmanship, fabric selection and color.

Monday, June 13, 2011

Over the Weekend

My Social Suicide has officially commenced.  I had to decline going to more events then I could shake a stick at this weekend for the sole purpose of getting a chunk of my wedding dress figured out.  I spent about 12 hours on the dress this weekend.  Most of that time was spent at the ironing board getting the final pleats done.  I re-evaluated my previous measurements while breaking in my reception shoes. The difficult thing with this is I know what I want the exterior to look like but before that I need to figure out how the interior is going to work.  With the dress being strapless I need to make sure it will stay up.  Also since it is empire waist that leaves not room for any supportive boning so I need to make sure that everything is tight and stays in place without it looking like the fabric is pulling or strained.  I also do not want it to be all the way to the floor since I have some fabulous shoes that need to see the daylight.

 My main work station this weekend, netflix on the laptop, connected to the speaker, bottle of water, sewing machine (Brother Innovis 80) and Serger on hand.  My narrow hem foot has been my best friend in finishing all my hems for this silk organza extravaganza.

The one night I went out was to a friend's 30th Birthday Party which was just a house party with a bonfire & pinata.   I wore mostly casual but most importantly I got to break out my new Dr. Scholl's (yes I will wear old lady shoes) flat wooden sandal and you can see my natural hair color. 
Allison Rose "Love your Librarian" T-shirt
Gold hoop and Gold Panther Choker from Express
Pink skirt from TJ Maxx
Baby Blue Swatch
Silver Metallic Dr. Scholl's Sandals

Finally my hair color as it was Saturday.  I plan to put some baby blue into it and get more of that blondish yellow out of it.but overall keeping to a green/turquoise coloring.

Monday, April 04, 2011

Wedding Dress Sagas

So the work on my wedding dress continues.

I have finished the embroidery for the bodice top of the dress.  It was a total pain and I admittedly cried several times when there were snags or mishaps in the positioning and hooping.  Just like in regular embroidery you have to hoop the fabric for machine embroidery.  You want everything to be perfect and precision. The embroidery itself only does a set of two flowers at a time,  There was a lot of trial and error to figure out how to hoop over previous embroidery without making the frame pop out of the hoop.  I also started with no stabilizer and a single basting stitch down the length.  Both were bad calls.  After the first two sets were done I knew I needed at least a tear away stabilizer to help keep the hoop from popping out against the slippery organza.  Then I also added rows of horizontal basting stitches across the first length wise basting stitching to give the two layers of organza more stability.  After that it was all about marking and repositioning before the next set of flowers.  One time my heart stopped as I was working on it and the boy didn't realize I was there and turned the lights off which also turn the power off in the studio.

I'm really happy with how it turned out, now I just need to remove the rest of the tear away stabilizer and the basting stitches.  I've decided to use cotton sateen for lining of the dress.  I've still got a long way to go
 like figuring out my closure if  I want it to be hook and eye tape, invisible zipper or what.  Also since this is strapless how to keep it up.  I think I am going to use a combination of lingerie elastic that has the slightly sticker side like on strapless bras and maybe retro fit a strapless bra into it as well.

I've also finished one row of the three rows of pleats for the bottom.  This is the middle section of pleats, they are 1" knife pleats, above them will be 1/2" knife pleats and below some 1" rufflles.  I made these pleats using a "Pleater" board that I made which I will follow up with a tutorial on how I made it and how to use a little later.  The black stitches are just basting to hold everything together before the final sewing.  I like using a darker thread so that I can see where i needs to be pulled out more easily.

The full dress so far and I really am not that tall!  It had been so long since I tried to put my pieces together I forgot the end of the inner layer of organza was the hem bottom and the pleats needed to be about 8-12 inches higher.  but you get the idea.  I also tried on the extra crinoline that my cousin got at her wedding to see the fullness for once I am done.

Lastly I got this fantastic gem in the mail!  It is my replacement for a veil, I am going to attach a birdcage type veil to it and hotfix Swavorski rhinestones to it.  You can buy it already blinged out on Etsy but I knew I could do that and didn't want to pay that full price.  In honestly I could of done the entire thing myself but it felt dirty to copy someone else's work even if it was just once for the wedding.  I felt I needed to at least buy the base and help support another artist out.   This headpiece can be found here!

Monday, March 28, 2011

Hats of Fancy

I feel a bit like a thief!  Majority of these photos are from Style Rookie, whom today has an incredibly delightful and open post about what it was like to sit next to Anna Wintour in a fashion show and being introspective on herself.  

Anyways that is not what my post is about.  Mine is actually pretty asinine in comparison but these are hats that I fell in love with from her blog.  I wish I had more reasons to wear cooky hats.  I have one little bow hat that I bring out once in a while to wear mismatched with a t-shirt and converse. Here is me and the hat on New Year's Eve on my crappy camera phone.
Now onto the gorgeous hats!
I think this one is layers of silk organza.  It is such a quietly dramatic piece, you really need to visualize the size of the hat when it is on a person crown to get the full effect.  It reminds me so much of this dress I spied while looking at wedding dress alternatives and bridesmaid options at Modcloth.

This hat reminds me of a the fish bones I find on the beach when we go to our friend's lake  house in Virginia.  Not at all disgusting but fascinating.  It looks like woven wood makes up this piece.  I wish I had another angle so I could see how it fastens to the head.

To me it looks like basket woven feathers.  So light and airy but at the same time it holds an uncanny feeling of density especially with the lopsided positioning on the head.

These two above and below are some of my favorites.  Back in college I would have dreams when I was double focusing in fashion and sculpture of making hats just like these for my future fashion shows.  I still dream about trying to create the bottom version in a mask form for some Halloween.

This was another hat that you just needed to see the entire ensemble to understand it's scale to the body which makes it that much more fantastic.  Not to mention that is one breathtaking dress!  If offered that dress i would wear it in an instant for my wedding.  But I'll just keep dreaming (ha).

More woven wooden wonders

All of Style Rookie's Photo's were from the "Accent on Fashion" exhibit in Antwerp.  
You can see her post here.

This is hat that is actually attainable through the BHLDN site.

Wednesday, March 02, 2011

Wedding Dress - Deux

After my last post with my dress design started I had to stop for a bit due to lack of materials.  You would think that 2 yards would get you something a little more substantial but not when it's a wedding dress.  I easily breezed through those two yards of 55" wide Organza without even getting the full front draped.  I quickly ordered 11 yard bolt from Dharma Trading.  Along with that I got silk threads in natural and white.  Turns out I only needed white.  You would think a huge amount of fabric would be in a big box but not really.  It came in a bubble mailer much smaller then anticipated.  Organza is very thin and squishy! You can see how it came to me when I opened the mailer.


Since I now had the fresh organza I decided to take some of my scraps and practice the embroidery on it to find the best method of stabilizer.  It is sort of strange because people use raw silk organza as a stabilizer on it's own.  So My first test for the colors and onto the organza I did two layers on top of each other in the hoop.  It was a little tricky since they wanted to slide against each other as I was setting it into the hoop.
I'm using this gorgeous Chrysanthemum embroidery design that was actually one of the free designs from Brother right here.


Watching the embroidery machine do it's magic is incredibly mesmerizing.  The constant humming and shifting of the frame and stitches is very soothing as well.  It makes you feel like you are getting a lot of progress even though all you did was set the pattern and push the button with the color changes in the thread.  I have no idea how on earth machine embroidery was possible before these beautiful electronic machines.
 

After I was done I played with positioning against what I already had.  I also found that my bust sash is going to have to be at least half an inch winder then I had originally draped. It's ok that's why we do muslin's and mock up's before we get really hot and heavy into the patterns or sewing things together. 


My night didn't end here,  While my wonderful machine was doing the embroidery I was at my other machine the Innovis 80 working on pleats and the hot hot steamy un-sexy iron.  It was very tedious and hot work.  The kitties made it that much worse.  They seem to have taken after their human mom and only prefer the finest of fabrics, thus they always want to get into my silks even though there is some awesome shredded up poly organza laying on the floor for them to mess with. 


Testing out two pleat sizes i decided I needed both and also a third tier at the bottom which will be a ruffle to add some volume to the end of it. In my sketches below there will be embroidery along the top bands and for the main long dress on the strip of fabric coming down the front. The Main dress is going to be mostly white with some hints of pastels.  I think the Second dress I am going to go with really rich deep colors to make it fun.


Yes it looks like a huge mess right now but it's all the process.  I had to take a step back to look at my dress.  it's hard to judge anything when you are up close and in the middle of it.  My suggestion is always to step back across the room or to face it through a mirror.  You really have to get a different perspective
when working on a complicated or personal garment or else your eyes could deceive you into hating it or making hasty unnecessary changes.