Showing posts with label dress. Show all posts

Tuesday, September 20, 2011

Bridesmaid Dress Resurrection

So one of the many projects that I completed on coming back from the Honey moon was taking this Bridesmaid dress I wore for my Cousins wedding almost a year ago and re-vamping it into something I would wear on a more consistent basis.  Or at least one more time. 
 This was the wedding and the dress in question.  It was a long purple semi mermaid dress.  It's just not a dress I would ever choose to wear myself.  Firstly I am not a purple girl and second long and mermaid just look terrible on my short frame.  People said it looked fine but if you aren't comfortable in the dress for yourself no matter how it looks you just won't be your best.  My solution was to make it a short dress.

 Here she is laid out on the table for dissection.  My idea was to cut her off and make gored godet insets to give fullness like a 1950's dress.

 After the exterior was cut to length I turned her inside out and cut the lining 2" shorter and hemmed it.  I didn't bother trying to do anything to the lining to increase the size because there is no point, it is a lining no one will see it.  The point of the lining is to keep the unsightly seams from showing on the inside and to make it easier to put the dress on and off without snagging on any seams.

 Me and my unenthusiastic trying on of the dress several times in the mirror to figure out where I wanted to cut it.  Also note the arthritic thumb brace I've been rocking due to my Knitting injury, yes that's right knitting injury.

 This is the shortened dress before I attempted to put fullness in. 
It isn't bad just the way it is.

 This was the the dress with the bottom portion of the skirt that I had cut off just attached to the waist.  This also isn't bad but then I tried to do something super complicated by layering the two skirts on top of each other to make the larger fuller one removable.  It would of worked except that I was too tired when I did this and frustrated that my head couldn't wrap around some menial problems.

 In the end I settled for just the short version of the dress with no volume.  It looks more modern this way and I can more easily pass this off to a friend for further mileage out of a once unloved bridesmaid dress.

 A close up of the folded top stitch hem.  Pressing hems is as key as pressing seams for a more finished look.

As for the remainder of the fabric I got some elastic and made myself a skirt so there was almost zero waste from the project.  My husband said "damn that's crafty a two for one"  You might see this simply sophisticated skirt at Craftin Outlaws for sale if you are lucky!

I did wear my new style dress out to my friend's wedding
Eliza and Steve

But of course the person taking the photos is very rarely in the photos themselves.  Hopefully someone else took a picture of me so that I can share it with you. Because the only photos I have make me look naked (thanks strapless dress in headshots!)

Thursday, August 11, 2011

Ending the Reception

I finished my reception dress last night.  Around 1:00 am I slipped it on and looked in the mirror, quickly put on my Vivienne Westwood rocking horse wing shoes and just stood happily in front of the mirror.  Below I'll you some of my progress from working on it the past couple days.  Unfortunately no photos of me wearing it quite yet.  I want the suspense to continue.

 So here is the dress when I was attaching it to the embroidered bodice.  At this point I wasn't sure what I was doing for the hem and I liked the gold lining the best underneath the jewel tones.

A detail shot after I had gathered and then basted in the lining before I made my final decision on whether to keep it or not.  I think it gave it just the right effect that I wanted.

Originally I had some horse hair braid that I wanted to put in the bottom of the hem to give it some structure but that was a mess.  I attempted to place is 3 times with basting stitches and it just kept looking wrong and not very clean since the organza was so sheer.  When I tried to double roll the organza it just made it look awkward with a heavy strip of color at the bottom.  I thought out of frustration I would pin it up to see how a bubble hem would look.  It was magical.  Good things happen when you least expect it. 

 Here the bubble skirt hem!  It looks so sweet and it worked out perfectly but I didn't stop there.  I still wanted to add some pizzazz and to make sure this puppy wouldn't fall off of me while dancing and singing my heart out at the reception.

I loosely pinned in some ideas for a multi strap that would also serve as a nice embellishment.  Nothing super fancy just a little weaving and creative placement.

 I made very narrow strips and then pressed them flat to work as thin straps and clean the look up.

 These are the final layout of the straps and a little embellishment  before I attached the inner bodice lining and zipper to finish her up.  I'm very happy with my results.


Thing's are getting real around the house.  We having near daily deliveries of gifts, and supplies for the wedding.  Yesterday our tote bags for out of town guest bags were dropped off and made by the Wonderful Alison & Nick Nocera of Alison Rose.  I love them!  I'm happy there will be a few extra so that I can keep one for myself.  
 I've been crazily cutting little squares and folding petals of fabric for my own Bouquet.
 I put the finishing touches on the Grandma's Corsages.  I wanted to them to be the same and different at the same time.  I think that I accomplished this pretty well by choosing some different colors to add in combination with the overall green in the petals.
Yet there is still so much more to do!  I have buttons to sew on my niece's flower girl dress to finish that off.  Bowties for the band members. Adjustments on the singer's dress.  Boutonniere's for the groom's men. Put together the pieces for the Bridesmaids hair bands.  My blusher Veil for the wedding Ceremony.  My ceremony jacket and train. Bouquets for the bridesmaids.  Paper Jellyfish for decorations.  I think that bout covers it in the "DIY" department.
Some things I can wait to do two days before the wedding since they will involve fresh flowers from my garden but that is still quite a bit to do.  It will get done, I will love it.  Remember it's not just DIY for a wedding but DIFY (do it FOR yourself),  if you don't enjoy it don't do it! ( I'll write more about that mater post wedding madness).
Cheers!

Thursday, August 04, 2011

Opening Reception

Now that the Wedding Dress is done I am moving onto my reception dress.  This is another play on the Korean style dress with a Western feel.  In this dress I have decided to keep the more traditional coloring for this dress but making it a short fun dress that normally would be totally inappropriate for Korean wedding.  But this is just the reception and I want to dance and have fun!

My other Best friend in Korea sent me these gorgeous embroideries as a wedding present.  I decided to use the bottom one as my bodice top.  It is wider then the one I am using for  my wedding dress and I am planning on putting straps onto this.  The upper fabric since there is more yardage I am going to attempt to make it into a short Korean style jacket.  The Fabric is much more stiff and I need to pre-wash it but I'm scared to do that.  Perhaps I will wait till the entire jacket is constructed (if I get that Far) before I do the wash.

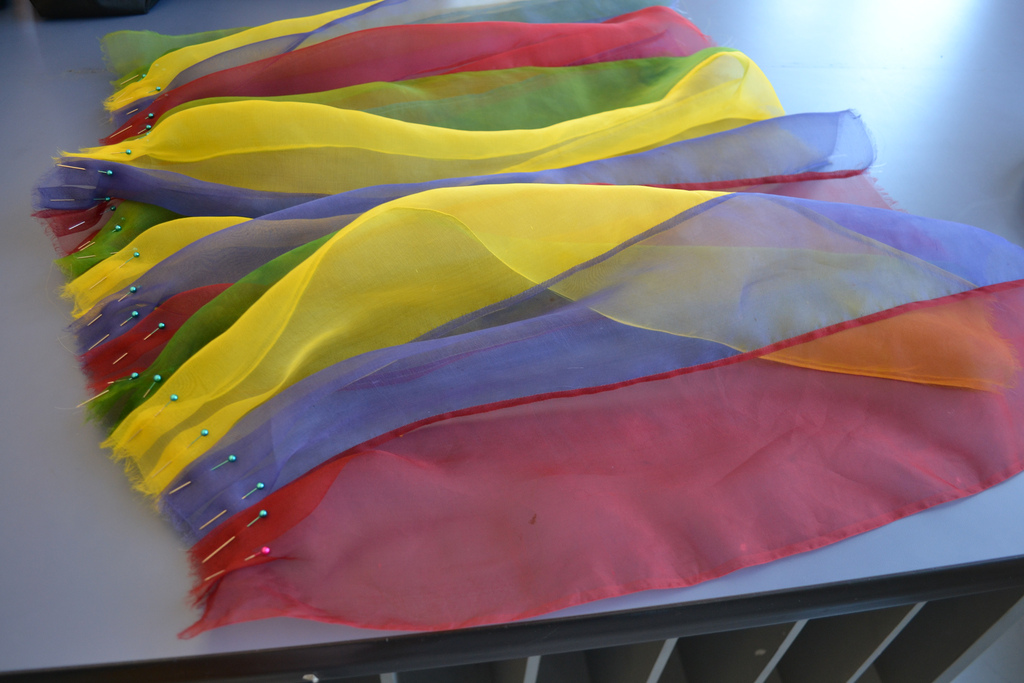
These are my colors for the skirt.  Right now I just stitched the strips together but the finishing on the edges was proving to be a problem.  Since this is sheer I didn't want to bulk it down with serge stitches on the inside or have them show through.

My Solution was using "invisible" thread.  It's like a very low gauge fishing line.  There is some strength behind this thread but you need to watch the tension as it sews and adjust accordingly.  It also likes to slip out of tension so if you are not careful when winding the bobbin you can create loops the bobbin which will mess up the stitches as you come to them.  Another weird quirk I ran into was how occasionally the thread would get double wound or caught up in the tension discs while sewing.  In hindsight I should of used a drop or two of Sewer's Aide on the spool to help glide it through the machine.


For finishing the seams nicely I decided to employ my skills at doing french seams.  When doing french seams the most important thing I feel is proper and frequent pressing.  I like to do my french seams in this order.
  1. Sew with wrong sides together 2/8" seam allowance
  2. Press with iron low steam the tiny seam allowance to one side
  3. Turn fabric so right sides are together and press at seam closed
  4. Sew with 1/4" seam allowance (with right sides still together)
  5. Press french seam to one side
Aren't the results lovely?

After the french seams I put my pleats in to take it from 106" down to a mere 36".  I'm very excited for these colors and how this is shaping out.  I need to baste down these pleats and then I can start to attach them to the embroidered bodice piece.

Thursday, June 23, 2011

Appreciate the little things

I finally got in my order from Denver Fabrics for some Swatches and wow, not exactly what I was expecting.  but I know one of them will work and it will be wonderful.  I'm just happy they came in and were fairly cheap.  I did half yard amounts so I can hopefully get the bodice for one or both dresses done.  These two dresses I am working on are for the singers in the Band at our wedding.  My friends Cover Band "My Kid Sister" was kind enough to let us be their first wedding!  As a Thank you to them I wanted to make them all a coordinating look.

 So here is my quick sketch just to give an idea of what the dresses will look like.  it's a 50's style bodice that is halter since it will but HOT in August or at least I expect it to be.  The first singer doesn't like things as tight fitting so I am giving her a full skirt.  The other singer says the tighter the better so she is getting a more Mad Men office girl look with a pencil type skirt and kick pleat in the back so she can still move and walk.  The men in the group will get coordinating bowties and I ask they wear suspenders and short sleeved white shirts.  I don't mind if they wear Dark denim jeans or dress pants.

 These are the swatches that I've gotten in the Pale green is out.  It's just too similar to my bridal colors and doesn't look good on the skin color of the ladies.  Dark Green and Blue are the options now.   I finished the draping over a month ago I just needed to wait some things out and get the measurements from the Ladies.  Now that I have it all I can start again.  The wedding dress is on a little bit of a stall as I wait for some more materials to be mailed to me from best friend which she got from our other best friend in Korea.  Just some authentic Korean Hanbok elements to add into my dress.

Monday, April 04, 2011

Wedding Dress Sagas

So the work on my wedding dress continues.

I have finished the embroidery for the bodice top of the dress.  It was a total pain and I admittedly cried several times when there were snags or mishaps in the positioning and hooping.  Just like in regular embroidery you have to hoop the fabric for machine embroidery.  You want everything to be perfect and precision. The embroidery itself only does a set of two flowers at a time,  There was a lot of trial and error to figure out how to hoop over previous embroidery without making the frame pop out of the hoop.  I also started with no stabilizer and a single basting stitch down the length.  Both were bad calls.  After the first two sets were done I knew I needed at least a tear away stabilizer to help keep the hoop from popping out against the slippery organza.  Then I also added rows of horizontal basting stitches across the first length wise basting stitching to give the two layers of organza more stability.  After that it was all about marking and repositioning before the next set of flowers.  One time my heart stopped as I was working on it and the boy didn't realize I was there and turned the lights off which also turn the power off in the studio.

I'm really happy with how it turned out, now I just need to remove the rest of the tear away stabilizer and the basting stitches.  I've decided to use cotton sateen for lining of the dress.  I've still got a long way to go
 like figuring out my closure if  I want it to be hook and eye tape, invisible zipper or what.  Also since this is strapless how to keep it up.  I think I am going to use a combination of lingerie elastic that has the slightly sticker side like on strapless bras and maybe retro fit a strapless bra into it as well.

I've also finished one row of the three rows of pleats for the bottom.  This is the middle section of pleats, they are 1" knife pleats, above them will be 1/2" knife pleats and below some 1" rufflles.  I made these pleats using a "Pleater" board that I made which I will follow up with a tutorial on how I made it and how to use a little later.  The black stitches are just basting to hold everything together before the final sewing.  I like using a darker thread so that I can see where i needs to be pulled out more easily.

The full dress so far and I really am not that tall!  It had been so long since I tried to put my pieces together I forgot the end of the inner layer of organza was the hem bottom and the pleats needed to be about 8-12 inches higher.  but you get the idea.  I also tried on the extra crinoline that my cousin got at her wedding to see the fullness for once I am done.

Lastly I got this fantastic gem in the mail!  It is my replacement for a veil, I am going to attach a birdcage type veil to it and hotfix Swavorski rhinestones to it.  You can buy it already blinged out on Etsy but I knew I could do that and didn't want to pay that full price.  In honestly I could of done the entire thing myself but it felt dirty to copy someone else's work even if it was just once for the wedding.  I felt I needed to at least buy the base and help support another artist out.   This headpiece can be found here!

Wednesday, March 02, 2011

Wedding Dress - Deux

After my last post with my dress design started I had to stop for a bit due to lack of materials.  You would think that 2 yards would get you something a little more substantial but not when it's a wedding dress.  I easily breezed through those two yards of 55" wide Organza without even getting the full front draped.  I quickly ordered 11 yard bolt from Dharma Trading.  Along with that I got silk threads in natural and white.  Turns out I only needed white.  You would think a huge amount of fabric would be in a big box but not really.  It came in a bubble mailer much smaller then anticipated.  Organza is very thin and squishy! You can see how it came to me when I opened the mailer.


Since I now had the fresh organza I decided to take some of my scraps and practice the embroidery on it to find the best method of stabilizer.  It is sort of strange because people use raw silk organza as a stabilizer on it's own.  So My first test for the colors and onto the organza I did two layers on top of each other in the hoop.  It was a little tricky since they wanted to slide against each other as I was setting it into the hoop.
I'm using this gorgeous Chrysanthemum embroidery design that was actually one of the free designs from Brother right here.


Watching the embroidery machine do it's magic is incredibly mesmerizing.  The constant humming and shifting of the frame and stitches is very soothing as well.  It makes you feel like you are getting a lot of progress even though all you did was set the pattern and push the button with the color changes in the thread.  I have no idea how on earth machine embroidery was possible before these beautiful electronic machines.
 

After I was done I played with positioning against what I already had.  I also found that my bust sash is going to have to be at least half an inch winder then I had originally draped. It's ok that's why we do muslin's and mock up's before we get really hot and heavy into the patterns or sewing things together. 


My night didn't end here,  While my wonderful machine was doing the embroidery I was at my other machine the Innovis 80 working on pleats and the hot hot steamy un-sexy iron.  It was very tedious and hot work.  The kitties made it that much worse.  They seem to have taken after their human mom and only prefer the finest of fabrics, thus they always want to get into my silks even though there is some awesome shredded up poly organza laying on the floor for them to mess with. 


Testing out two pleat sizes i decided I needed both and also a third tier at the bottom which will be a ruffle to add some volume to the end of it. In my sketches below there will be embroidery along the top bands and for the main long dress on the strip of fabric coming down the front. The Main dress is going to be mostly white with some hints of pastels.  I think the Second dress I am going to go with really rich deep colors to make it fun.


Yes it looks like a huge mess right now but it's all the process.  I had to take a step back to look at my dress.  it's hard to judge anything when you are up close and in the middle of it.  My suggestion is always to step back across the room or to face it through a mirror.  You really have to get a different perspective
when working on a complicated or personal garment or else your eyes could deceive you into hating it or making hasty unnecessary changes.